Use Existing SQLite Database in Android App
In my previous post about SQLite , I only post the way to create database when application started.
In reality, we do not only need a database to store data but also need one to read information from.
So, in this post, I will show you how to use existing SQLite database in Android app.
The basic idea for this case is instead of creating a new database, we copy the exist one to the application’s data folder.
Very simple, right?
Now, we’ll go straight to the demo for easier understanding.
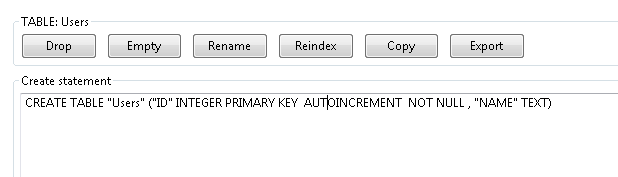
First, create a Test database:
Enter some dummy data:

The very first thing you need to do when you want to use SQLite is create a sub class of SQLiteOpenHelper.
Create some constants for database name, table name, and the database path: {% highlight java %} public class DatabaseHelper extends SQLiteOpenHelper {
public static String DB_PATH = "/data/data/ice.tea09.sqlitedemo/databases/";

public static String DB_NAME = "Test.sqlite"; public static final int DB_VERSION = 1;

public static final String TB_USER = "Users";
} {% endhighlight %}
Note that ice.tea09.splitedemo is your project namespace.
Implement constructor, and some methods of super class: {% highlight java %} private SQLiteDatabase myDB; private Context context;
public DatabaseHelper(Context context) { super(context, DB_NAME, null, DB_VERSION); this.context = context; }
@Override public void onCreate(SQLiteDatabase db) { // TODO Auto-generated method stub
}
@Override public void onUpgrade(SQLiteDatabase db, int oldVersion, int newVersion) { // TODO Auto-generated method stub
}
@Override public synchronized void close(){ if(myDB!=null){ myDB.close(); } super.close(); } {% endhighlight %}
Method checkDatabase() allow you to check if the database exists on the phone or not:
{% highlight java %} /***
-
Check if the database is exist on device or not
-
@return / private boolean checkDataBase() { SQLiteDatabase tempDB = null; try { String myPath = DB_PATH + DB_NAME; tempDB = SQLiteDatabase.openDatabase(myPath, null, SQLiteDatabase.OPEN_READWRITE); } catch (SQLiteException e) { Log.e(“tle99 - check”, e.getMessage()); } if (tempDB != null) tempDB.close(); return tempDB != null ? true : false; } {% endhighlight %} Method copyDatabase() used to copy SQLite file in assets folder to data folder of application on the phone: {% highlight java %} /**
-
Copy database from source code assets to device
-
@throws IOException */ public void copyDataBase() throws IOException{ try { InputStream myInput = context.getAssets().open(DB_NAME); String outputFileName = DB_PATH + DB_NAME; OutputStream myOutput = new FileOutputStream(outputFileName);
 byte[] buffer = new byte[1024];
 int length;

 while((length = myInput.read(buffer))>0){
     myOutput.write(buffer, 0, length);
 }

 myOutput.flush();
 myOutput.close();
 myInput.close();
} catch (Exception e) { Log.e(“tle99 - copyDatabase”, e.getMessage()); }
} {% endhighlight %} openDatabase() method: {% highlight java %} /***
- Open database
- @throws SQLException */ public void openDataBase() throws SQLException{ String myPath = DB_PATH + DB_NAME; myDB = SQLiteDatabase.openDatabase(myPath, null, SQLiteDatabase.OPEN_READWRITE); } {% endhighlight %}
Finally, createDatabase() method - which will be called every time we launch app. It will check if the database does not exist on the phone, It’ll copy the database to data folder of application: {% highlight java %} /***
-
Check if the database doesn’t exist on device, create new one
-
@throws IOException */ public void createDataBase() throws IOException { boolean dbExist = checkDataBase();
if (dbExist) {
} else { this.getReadableDatabase(); try { copyDataBase(); } catch (IOException e) { Log.e(“tle99 - create”, e.getMessage()); } } } {% endhighlight %}
Finally, method that help you retrieve data from database:
{% highlight java %}
public List
try {
    c = db.rawQuery("SELECT * FROM " + TB_USER , null);
    if(c == null) return null;

    String name;
    c.moveToFirst();
    do {
        name = c.getString(1);
        listUsers.add(name);
    } while (c.moveToNext());
    c.close();
} catch (Exception e) {
    Log.e("tle99", e.getMessage());
}

db.close();

return listUsers;
} {% endhighlight %}
The way we using DatabaseHelper in MainActivity: {% highlight java %} public class MainActivity extends Activity {
DatabaseHelper dbHeplper;
ListView lvUsers;
ListAdapter adapter;

@Override
protected void onCreate(Bundle savedInstanceState) {
    super.onCreate(savedInstanceState);
    setContentView(R.layout.activity_main);

    dbHeplper = new DatabaseHelper(getApplicationContext());
    try {
        dbHeplper.createDataBase();
    } catch (IOException e) {
        e.printStackTrace();
    }

    lvUsers = (ListView)findViewById(id.lvUsers);
     List<String> listUsers = dbHeplper.getAllUsers();

    if(listUsers != null){
        adapter = new ArrayAdapter<String>(getApplicationContext(),
                android.R.layout.simple_list_item_1, android.R.id.text1,
                listUsers);
        lvUsers.setAdapter(adapter);
    }

}

@Override
public boolean onCreateOptionsMenu(Menu menu) {
    // Inflate the menu; this adds items to the action bar if it is present.
    getMenuInflater().inflate(R.menu.main, menu);
    return true;
}
} {% endhighlight %}
Demo result:

Source code:
https://drive.google.com/file/d/0BzvV1wN-WHWwWG5LQm01ZnNJTzQ/edit?usp=sharing